How to Generate Medical Animations with Natomy
Natomy's video mode turns a handful of reference images into a short animation, without having to learn complex software like Cinema 4D, Blender, or Maya.
This guide shows how to use the video feature and the best practices. Prefer to watch instead of read? Check out the video walkthrough on YouTube.
What you need before you start
Natomy's video generator is images-to-video, not text-to-video. You can't type a description and get a video from nothing, you need reference images to animate. This keeps the output grounded in real source material instead of drifting into whatever the model imagines.
You'll need:
- 2–9 reference images (JPG or PNG, up to 16MB each) — The better the images, the better the output. Ideally the images should be a of a similar style and show some sort of transition.
- A short text prompt describing the desired motion and camera behavior
Step 1: Upload your reference images
Drag and drop up to 9 images into the upload area, or click to browse. Each image is automatically labeled Image1, Image2, and so on, in the order you add them.
If you need to change the order, drag the thumbnails to rearrange them. Any @Image references already typed into your prompt renumber automatically to match, so you don't have to rewrite your prompt after reordering.
Step 2: Write the prompt
The prompt field supports two shortcuts that make it easier to direct the animation precisely:
- Type
@to insert a reference to one of your uploaded images (e.g.@Image1,@Image2) - Type
!to insert a common camera movement from a preset list: Zoom In, Zoom Out, Keep Camera Static, Orbit, Pan Left, Pan Right. This list in non exhaustive and of course you can use camera movements not included in the list.
A well-structured prompt names the images explicitly and sequences the motion:
Animate the normal knee @Image1 into the ACL tear @Image2, keep the camera angle static until the ACL tear is complete. Then zoom in.
Being explicit about sequencing and camera behavior produces more predictable results than a vague description of the end state alone.
For best results, keep the prompt under 200 words and use terminology that a first-year medical student would know. The video model does not have the understanding of an experienced attending, so if you use some complicated anatomical/surgical landmark that only a specialist would know it will not work. Think of the video model as your film making assistant that dropped out of med school
For longer or more complex animations, break the prompt into labeled shots (Shot 1, Shot 2, Shot 3...), each describing one beat of the sequence and referencing its own images:
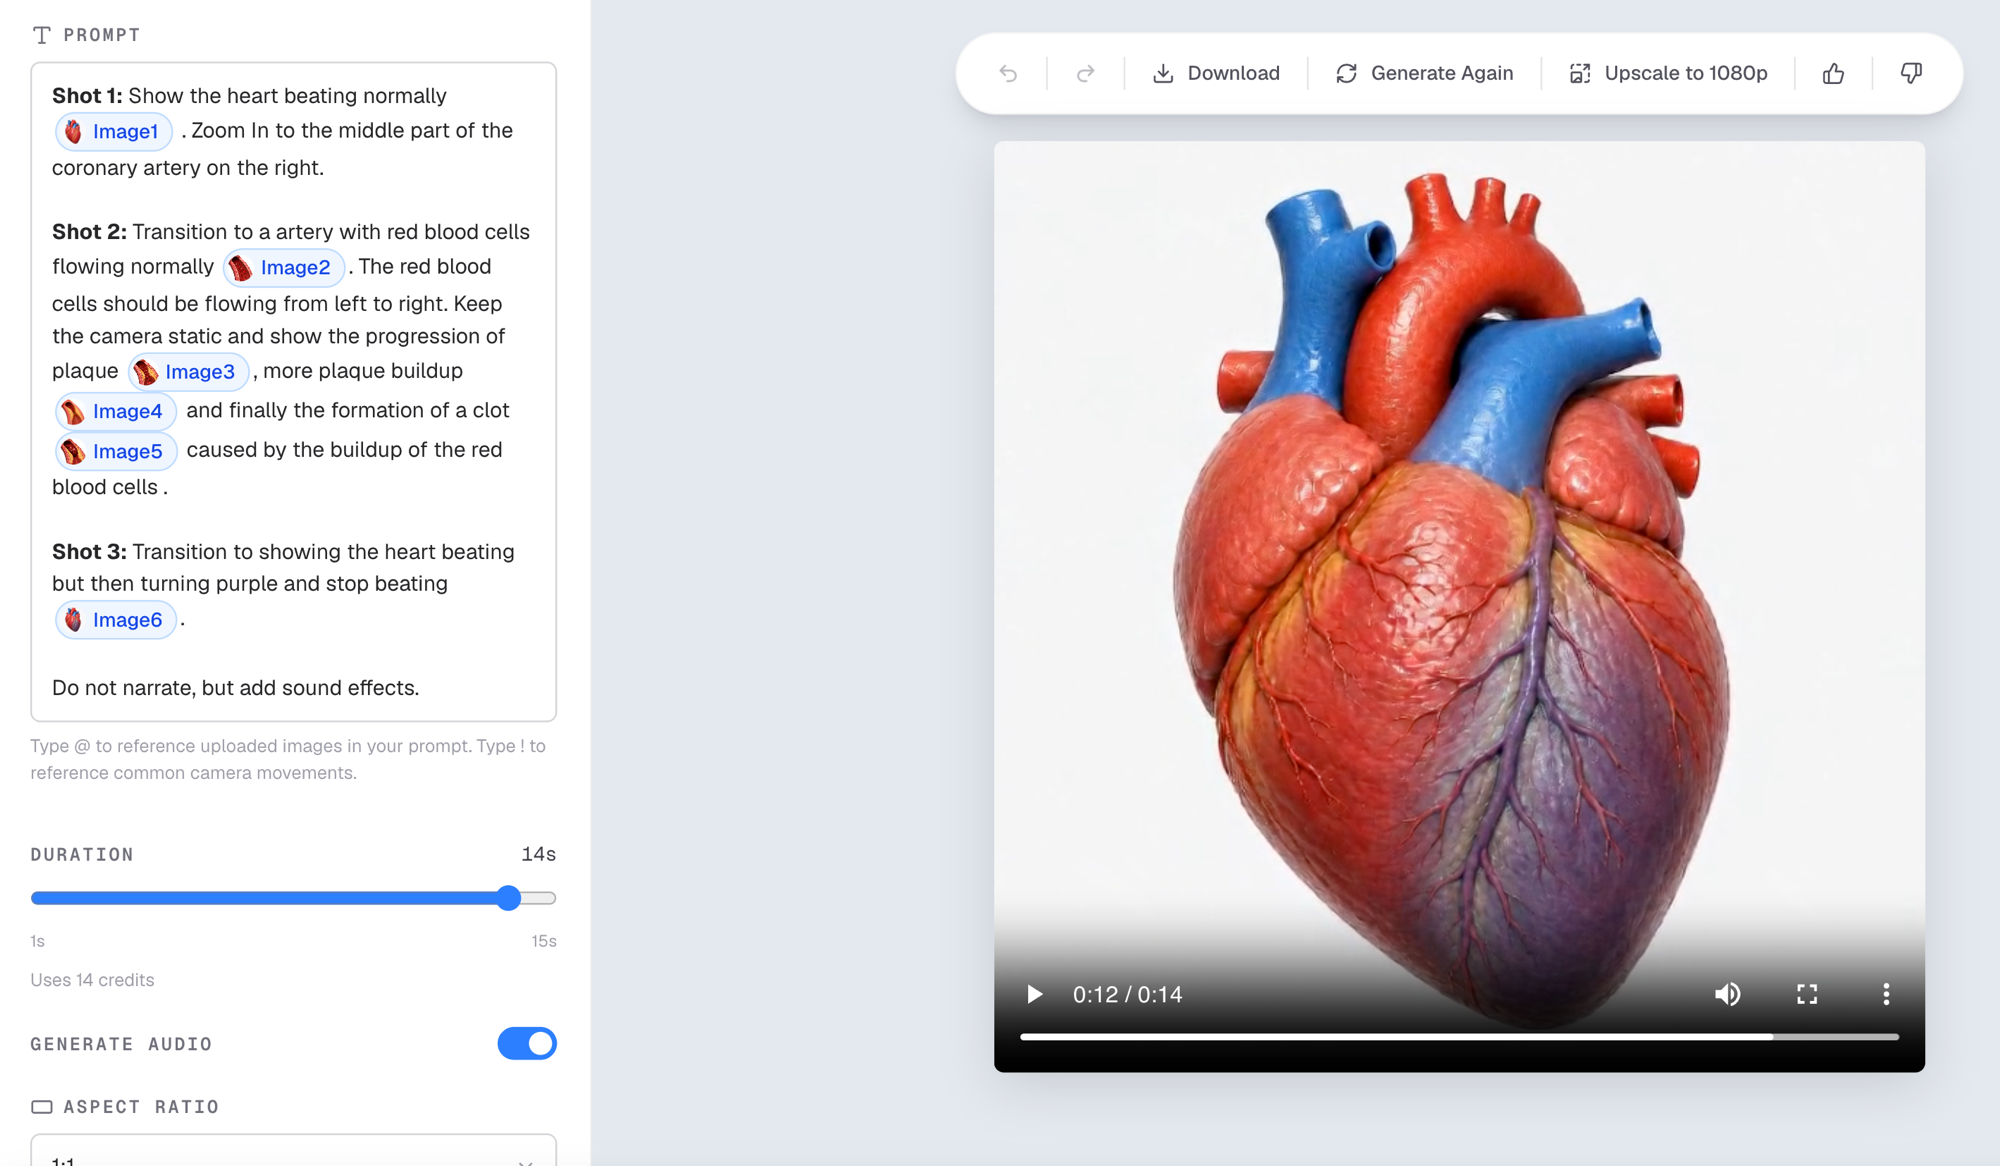
Step 3: Set duration and options
- Duration — drag the slider from 1 to 15 seconds. The interface shows live "Uses N credits" as you adjust it, since video generation costs 1 credit per second (a 10-second clip costs 10 credits). For best results create smaller clips between 5-10 seconds. You can creating longer videos by connecting clips together.
- Generate Audio — toggle on if you want an audio track generated alongside the video. You can tell the model to narrate or add sound effects.
- Aspect ratio — choose a portrait ratio (
3:4,9:16,9:21) for social or mobile-first content, or a landscape ratio (16:9,4:3,1:1) for presentations and slides.16:9is the default.
Step 4: Generate and review
Click Generate Video. Natomy uses a lower resolution and faster model so there is less waiting between results. A 10 second video should take between 90 seconds to 2 minutes. Once it's ready, you can:
- Download the render as an MP4
- Upscale to 1080p for an additional 1 credit, note that its only 1 credit even if the video is 15 seconds long
- If you are having trouble getting the result you want chat with us using the chat widget on the site and we can help you.
Tips for better results
- Use images that clearly represent distinct states. The model interpolates between what you give it, so the clearer the start/end reference images, the more coherent your result will be.
- A tightly prompted 5-second clip that isolates the key moment is often more useful — and cheaper — than a meandering 15-second one.
- If you have a complex video with multiple transitions or cuts break the prompt down using Shots. I.e. Shot 1, Shot 2, Shot 3
- Try to keep your prompts under 200 words and use simple language
Ready to generate your own medical animation?
Upload reference images and generate a short animation in minutes.
Try Natomy →